IoT Connected Humidity Monitor using Exosite1
Introduction
This Inspired Project uses a PIC® microcontroller with an Ethernet controller to send data from a humidity sensor to an online management dashboard. The project demonstrates how to remotely monitor the humidity and temperature in a room and ensure that the conditions stay optimal, such as a basement, an attic, or even a greenhouse. This project also serves as a framework for connecting any sensor data to the Exosite IoT management platform, and in turn, easily expands to monitor more than just humidity and temperature.
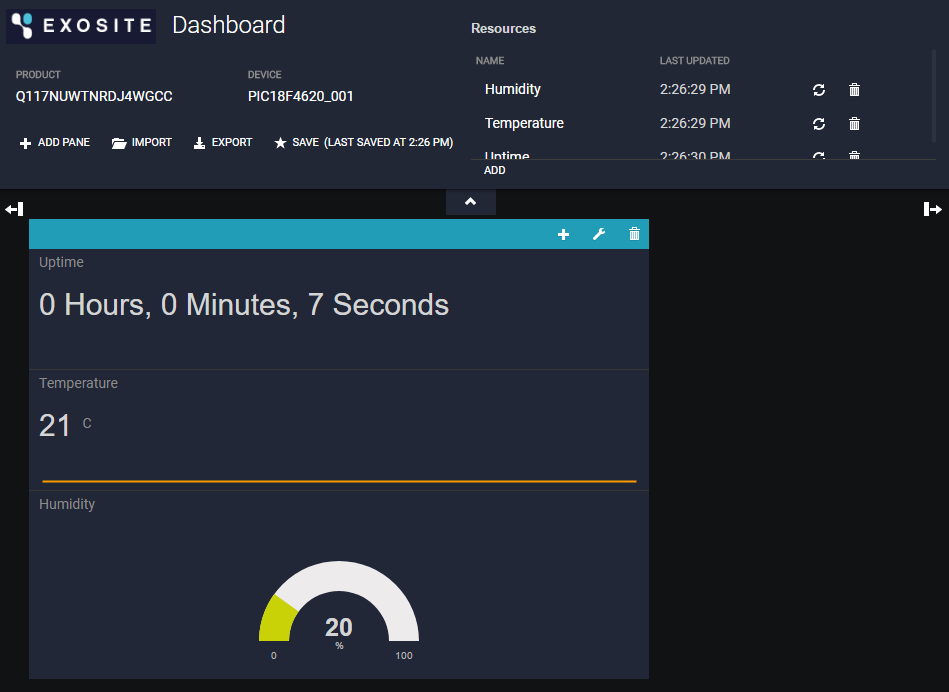
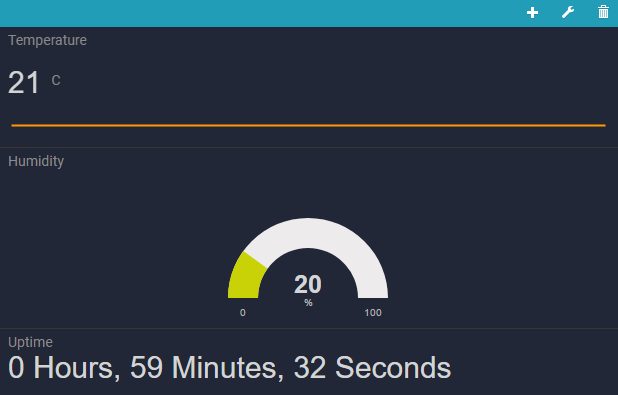
This paper explains how to create an Exosite account and set up a product, use the CCS Project Wizard to push the data with limited coding, and explain the robust implementation that will produce the dashboard shown above. Files for these two projects are in the zip file which can be downloaded from the CCS Inspired Project page referenced in the footnote. These code files have additional documentation not found in the article.
The project implementation was done on a CCS Embedded Ethernet Development Kit with a DHT11 humidity and temperature sensor. The Embedded Ethernet Development Kit contains a PIC18F4620 microcontroller, connected to a ENC28J60 Ethernet controller over SPI. The DHT11 is a small sensor that measures humidity and temperature, and communicates digitally over a single pin. Both sensors are also included in the CCS Sensors Explorer Kit for the E3 Mini Development Board.
1 Useful Links:Exosite
Account Setup
Exosite is a company that offers an Internet of Things hosting solution, called Murano, which creates a custom management platform for IoT devices. Exosite offers a free service allowing one to set up a single product type while having up to 10 devices connected to it simultaneously. Further functionality can be purchased on a monthly subscription, however, that will not be necessary for the scope of this project.
Set up an account by going to https://exosite.com, and click on the button 'Try Our Platform' at the top right of the webpage.

Scroll down to find the account information text fields. Enter in a name, email, phone number, and company name. Then select small business and Discover/Research and finally click on the "Sign Up For Free" button.
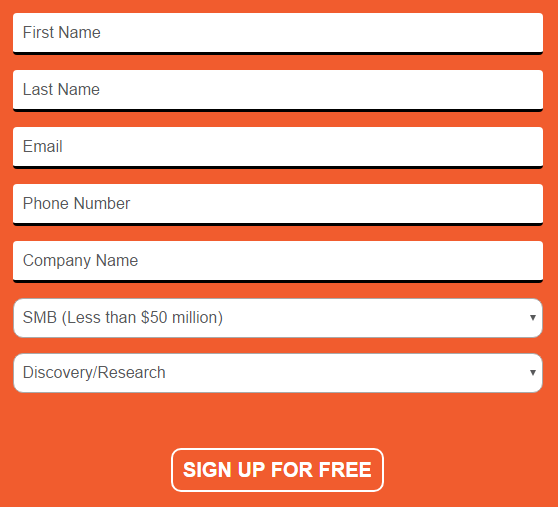
Exosite will send an email in which to verify the account. Click the link in the email and then click submit on the next screen. It will then prompt a password to be entered, enter and confirm the password, then click "Create Account" and "Create Your First Solution." It will then redirect to the home page where there will be options to manage the account, products, etc.
In Exosite, solutions can be either "Applications" or "Products." Products represent a type of device that can connect to ones platform and can have several (10 with the free account) of those devices connected at once. In Product, there is the ability to define the settings such as the type of authentication to use, as well as what data the devices will be communicating. Applications are used to create more fully featured web interfaces and can integrate in multiple products. That is out of scope for this project so one will only be working with Products. To create a new Product, Click "+ New Solution" and then "Add a Product".

Enter a name for the product and select "Start From Scratch" for "Choose Starting Product Point." Then click "Add."
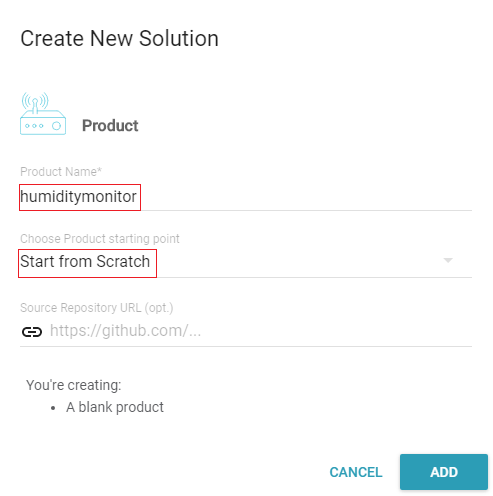
Exosite Product Setup
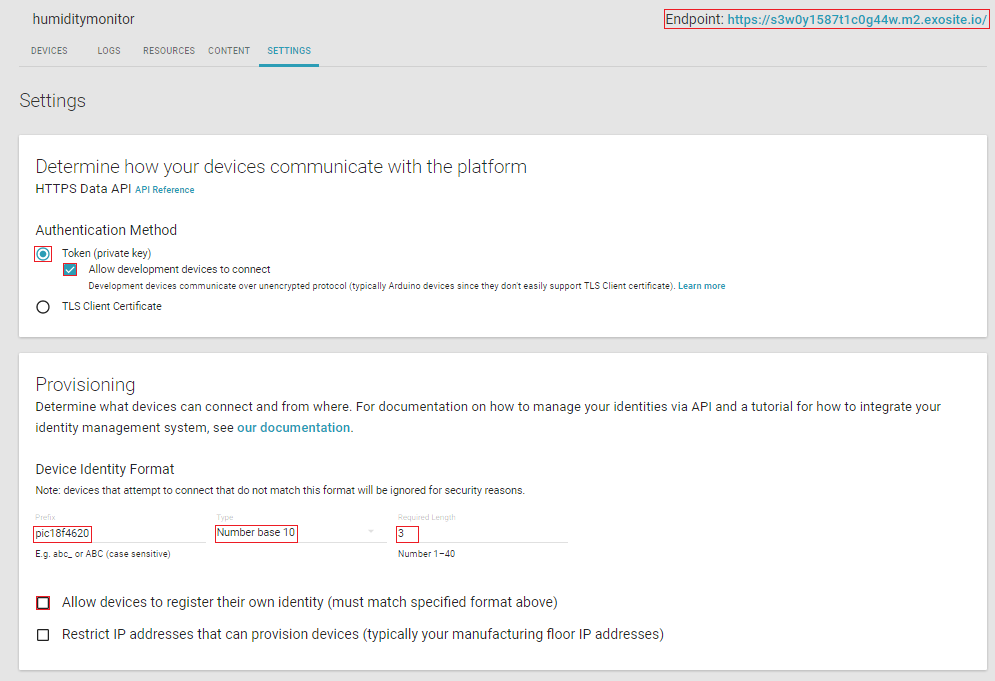
The new Product will now populate under Solutions. Click on it to go into the Product's settings. The Product page has 5 tabs that separate its functions: Devices, Logs, Resources, Content, and Settings. Also note the endpoint link in the top right corner. The string of characters before ".m2.exosite.io/" is the Product ID and this link will be needed for connecting devices. Navigate into the Settings tab, make sure "Token (Private Key)" is selected under Authentication Method, and also check "Allow development devices to connect". This needs to be selected since the HTTP client generated by the Project Wizard cannot make secure connections (HTTPS). The development devices option allows devices to connect through regular, unencrypted HTTP. DO NOT send any kind of sensitive data such as passwords using this. HTTP is sent as raw ASCII characters meaning that it can be intercepted and read with little effort. Also note that when connecting via HTTP instead of HTTPS, use "http://<Product ID>.devmode-m2.exosite.io/" in place of the normal endpoint URL.
One can setup a format for device ID's under the Provisioning section in the Settings tab. All devices that connect will need to use an ID that fits this format in order to authenticate with Exosite. The prefix will be the same for every device and then one can configure a variable ID that will follow. The code included with this article expects the prefix to be "pic18f4620_" with a 3 digit base 10 number following. However, it can be modified to use another ID format if necessary. Enter in a format and then uncheck "Allow devices to register their own identity". This means that device ID's will have to be whitelisted first before the device can be provisioned. Click Save when finished.
Now set up the variables that the devices will be able to update. In Exosite, these are referred to as Resources. All Resources are configured with a name, an expected format for their data, allowable values if the data needs to be something specific, as well as a unit symbol if applicable. Resources can also be configured so that they can be modified from the dashboard and read by devices, allowing for remote control of the device in addition to monitoring.
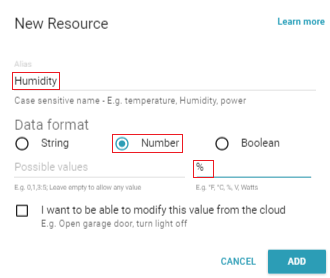
For this project, three Resources are needed to setup for updating the humidity, temperature, and device up-time. Switch to the Resources tab and select "+ New Resource." In the pop-up window, enter "Humidity" for the Alias, select "Number" for the Data Format, enter "%" for the unit, and click Add. Repeat this process to add resources for temperature and up-time using the following settings.
Name: "Uptime" - Data Format: "Number" - Unit: "s"
Simplify the process and get data pushing up to Exosite as quickly as possible by skipping the device provisioning process and just send update requests. This is not the best practice for Exosite, but it will work and can be done almost entirely with the CCS Project Wizard. The provisioning process will be included in the more robust implementation found later.
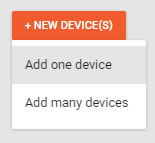
Exosite's provisioning uses a 40 character key that is needed for every request the device will make. This key is generated and sent back when a device makes a provisioning request. In order to skip this process, generate the key in the web interface and copy it into the project wizard. Go to the "Devices" tab, click "+Add" and then "Add New Device".
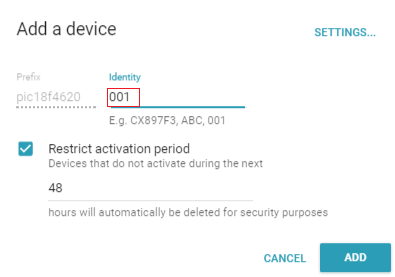
A new window will pop up. The device identity will not be needed for anything when skipping provisioning so enter anything there. Click "Add" to finish creating a new device.
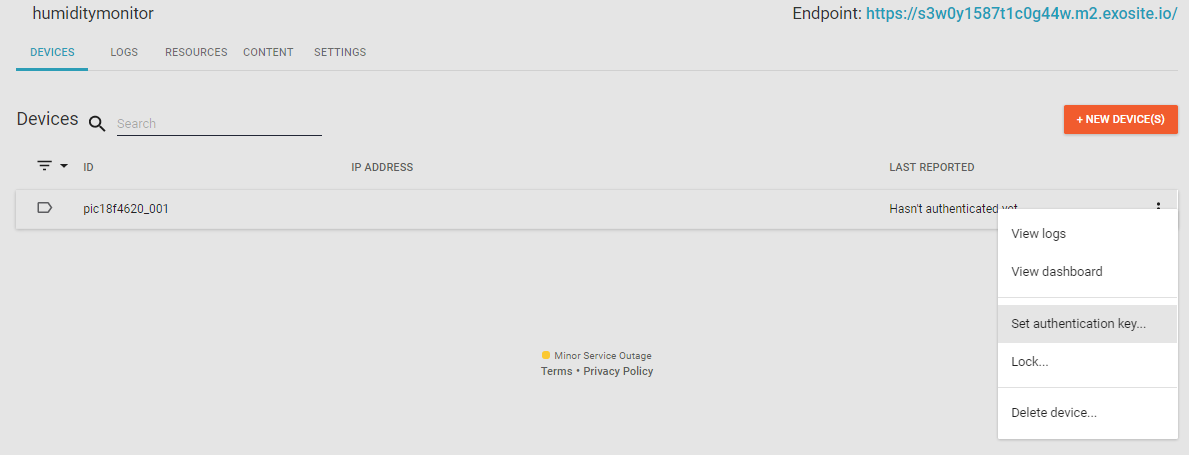
Generate the provisioning token for this device. Click on the three dots on the right side of the device entry, then click on "Set Authentication Key".
In the window that pops up, copy the code that appears in the "Token" text box and save it touse shortly. Make sure not to change the code at all and click "Save." Exosite is setup and ready to create code for the PIC® MCU.
Quickstart Project Implementation: Wizard Settings
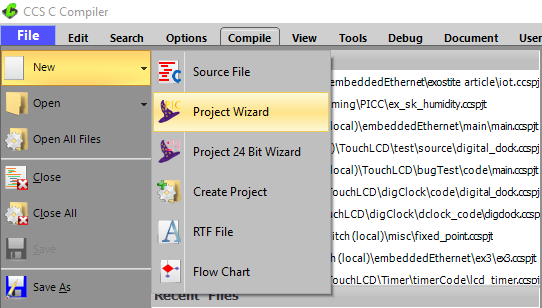
In order to communicate with Exosite, devices must make requests using their HTTP API (http://docs.exosite.com/reference/products/device-api/http/). The CCS Project Wizard has the ability to generate code for running an HTTP client on TCP/IP compatible processors. To get started, open up CCS IDE and navigate to File > New > Project Wizard.
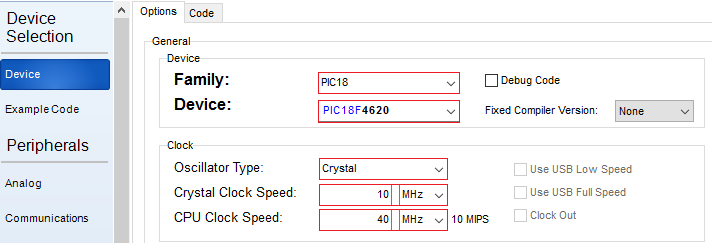
In the explorer window, browse to a desired location and name the file, and click Save. The project settings window will then pop up. Under the Device tab, set the device to "PIC18F4620", the Oscillator Type to "Crystal", the Crystal Clock Speed to "10 MHz", and the CPU Clock to "40 MHz."
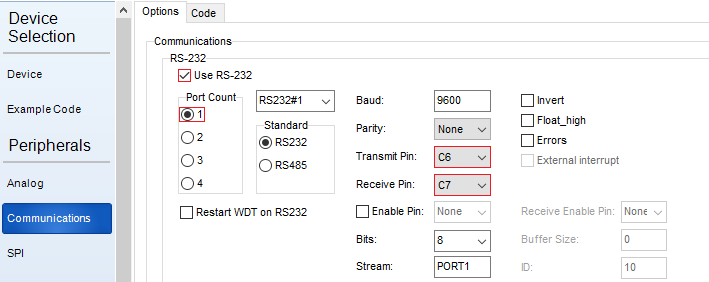
Switch to the Communications tab. Check the box for "Use RS-232", set Port Count to "1", set the Transmit Pin to "PIN_C6", and the Receive Pin to "PIN_C7".
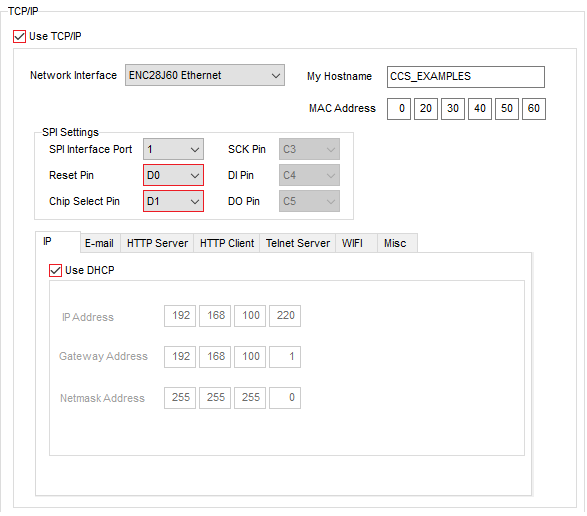
Now switch to the TCP/IP tab. In the top section, select the check box for "Use TCP/IP," set the Network Interface to "ENC28J60 Ethernet," set SPI Interface Port to "1," set the Reset Pin to "D0," and the Chip Select Pin to "D1". Then, under the IP tab at the bottom, check the box for "Use DHCP."
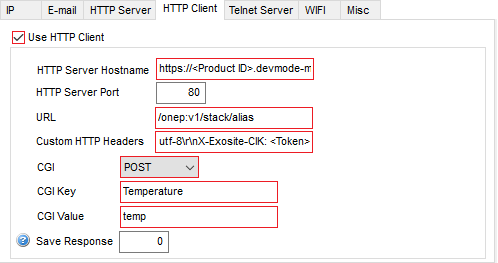
Switch the bottom tab from IP to HTTP Client and check the box for "Use HTTP Client." Enter the following into the text boxes below. This will setup the request needed to send data to Exosite.
- HTTP Server Hostname: https://<Product ID>.devmode-m2.exosite.io
- Change <Product ID> to the string of characters from your product URL.
- URL: /onep:v1/stack/alias
- Custom HTTP Headers: application/x-www-form-urlencoded; charset=utf-8rnX-Exosite-CIK: <Token>
- Replace <Token> with the 40 character token you generated for the device
- CGI: POST
- CGI Key: Temperature
- CGI Value: temp
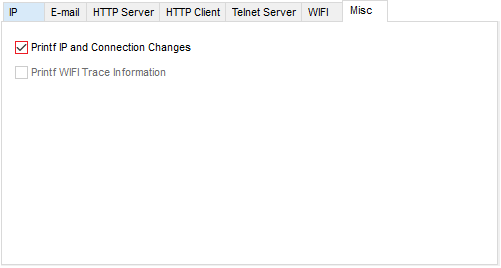
Select the bottom tab to Misc. Select the checkbox for "Printf IP and Connection Status". This will default the system to print out changes in MAC, IP address, etc. to the serial port. Then select Create Project.
Quickstart Project Implementation: Code Changes
The wizard will generate all the necessary code and place it in the directory that is selected. The file for the HTTP client has also been generated, and can be found in the "Files" tab under "TCPIP Stack > ccs_http_client.h". This header file has documentation in it for how to use the client functions to make requests, and reading this is encouraged. A copy of this project can be found in the zip file included with this article under the "quickstart" directory. (Note one will have to change <Product ID> and <Token> to your values).
The wizard will have generated two primary files that will need editing. These files are located in the project root directory and have the same name as project name given. There will only be a few modifications to make to get the project functioning. Open the project header file and add the following line below "#include <18F4620.h>"
#fuses NOWDT
Then append these lines at the very bottom of the file.
#include <dht11.c>
Open the main C file and go to the line "HttpClientAppendCgiROM...". Change this so that it alternatively sends the temperature and humidity data from the DHT11 sensor. Remove that line and add these in its place.
int8 humid;
dht11_read(&humid, &temp);
char str[10];
sprintf("%u", temp);
HttpClientAppendCgi(cgi, "Temperature", str, sizeof(cgi));
sprintf("%u", humid);
HttpClientAppendCgi(cgi, "Humidity", str, sizeof(cgi));
Go to the bottom of the file to where there is a comment that says "// todo: specify action condition...". Change the if statement so that it fires a request as long as it has an IP address and it is not currently waiting for a response. Replace the empty if statement with this.
if ((!g_MyHttpSending) && DHCPIsBound(0))
Lastly, add this line below "g_MyHttpSending = FALSE;". This will add a 5 second delay between every request. There is the option to modify this line to have a different delay if desired.
delay_ms(5000);
Quickstart Project Implementation: Build and Run on Hardware
Follow the next series of steps to connect to the board and program to run the code.
- Connect an ethernet cable to the ethernet connector on the board.
- RS232 serial cable (3.5mm jack) from the board to the computer.
- ICD modular cable from RJ45 jack on board to ICD unit and USB cable to the computer.
Connect jumper wires to each of the pins on the DHT11 sensor. Connect the left pin to +5V, the right pin to Ground, and the middle to the pin specified in the header file. Last, plug the AC adapter into the wall and then into the board.
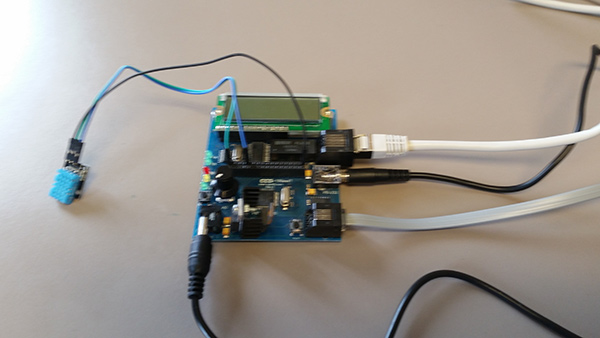
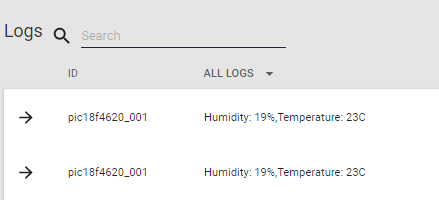
The system is ready to be programmed. Back in the CCS IDE, select "Build & Run" from the compile tab. Then open up the Serial Monitor and configure it to use whichever COM port the serial cable is plugged into at a Baud Rate of 9600. After programming is complete, there should be a message displayed saying it acquired an IP address. If it did, confirm that the updating is working by checking the "Logs" tab on your Exosite Product page. There should be an entry for every update on there listing the temperature and humidity. If the right data is showing up in the logs, then it is working correctly!
Full Implementation: Code Changes and Explanation
This section includes the more complex part of the project with multiple request types, including provisioning and uptime. The zip file downloaded includes a project for this, with some minor edits to get it working.
Open the project using the "iot_full.ccspjt" file. Note that there are four main source files. "iot_full.c" and "iot_full.h" were both generated using the project wizard like in the previous sections, but have been heavily modified. "exosite.c" and "exosite.h" are a library for creating the different requests used in this implementation.
Only one line will need to be modified for this project to work. Open file "iot_full.h" and find the line "//#define EXO_PRODUCT_ID <Your Product ID>". Change "<Your Product ID>" to the string of characters from the product endpoint URL. There is also an option to uncomment the line "define EXO_DEV_ID_NUM 5" to set a different device ID number. Otherwise it will default to 1. This is necessary for whitelisting/provisioning multiple devices.
The given project files contain documentation on how this project works, it can be useful to read. Two switch statements will pop-up in "iot_full.c" that form a finite state machine. This state machine handles the order that the different requests need to be sent to Exosite, as well as form the data update loop. This design makes modifying and even adding additional requests possible simply by adding more states and transitions. This means that this code can be used as a template for using pretty much any, or even multiple, HTTP API(s).
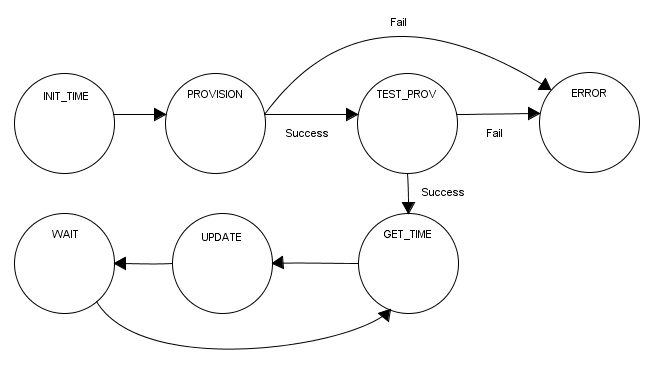
It is recommended to read the documentation on HTTP API to understand the actual requests that are being made to Exosite. However, here is a short overview of the process. The first request sent is one to initialize the time of the device, which is then used to calculate uptime later. The Get Time request to Exosite does not require the device to authenticate or provision so this is done first. Next the device provisioning is done. A request is made to provision the set device ID. If this is successful, a 40 character token is returned in the request response which must be used in all subsequent requests (except for getting the current time). This token is then stored into the EEPROM memory on the PIC18F4620 so that it will be able to resume after start-up. A request is then made to test that the provision was successful. If this test or the provision fail, the system transitions to the ERROR state, so that no more requests will be made until reboot. If it is successful, the system will transition into the update loop.
First it will request the current time and then calculate the device's uptime. Then it will do a read in from the DHT11 to get the temperature and humidity. Lastly, it will send these values to Exosite in an update request. After that, the system will wait the specified number of seconds and then repeat the update process indefinitely.
Full Implementation: Whitelist, Build, and Run
The last step is to whitelist the device ID on Exosite, and then connect and program the device. Go back to your Product page and click on the "Devices" tab. Then click on the "+ New Device" button, and then "Add one device".
The window that pop-ups will display the prefix entered in the "Settings" tab. Enter the device ID ("001" if left as default) under "Identity" and then click "Add".

That device ID has now been whitelisted and can be provisioned. If multiple devices are being set up, one will need to set and whitelist a unique ID for each of the devices, as well as set different Ids in the project header file.
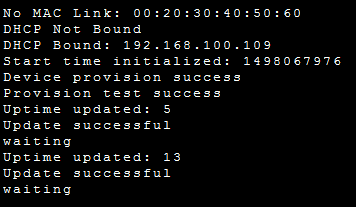
Reconnect the board as done before, then compile and run the project. If the Serial Monitor is opened there should be a similar output displayed. If this is done, everything should be functioning correctly. To verify this, check the logs section on the Product page.
Full Implementation: Dashboard Setup
The last thing to do is to set-up the device dashboard which was previewed at the beginning of the article. Go to the devices tab on the Product page, click on the 3 dots on the right side of the device entry and select "View Dashboard".

One will be directed to the dashboard page for this device, where there is the ability to configure what and how information is displayed. In the dashboard there are two main containers for information, Panes and Widgets. Widgets configure and display information and Panes contain one or more Widgets. For this project, there will be one Pane displayed over two columns that contains three Widgets, one for each resource. To create a pane, click on the "+ Add Pane" button.

Next, click on the wrench icon on the new Pane. In the pop up, leave "Name" blank and set "Columns" to "2", then click "Save".

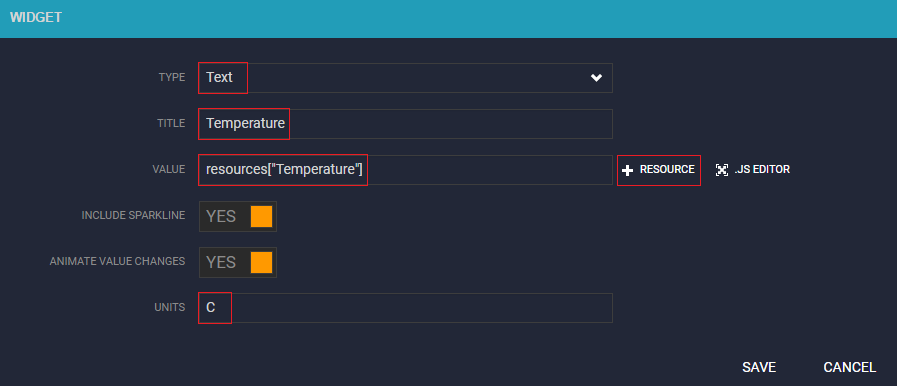
Now there is the option to create the Widgets for the Temperature and Humidity Resources. Click on the "+" button in the new Pane to start creating a Widget. Set the type to "Text", the Title to "Temperature", click on the "+ Resource" button and select "Temperature" from the drop down list, and enter "C" for units.
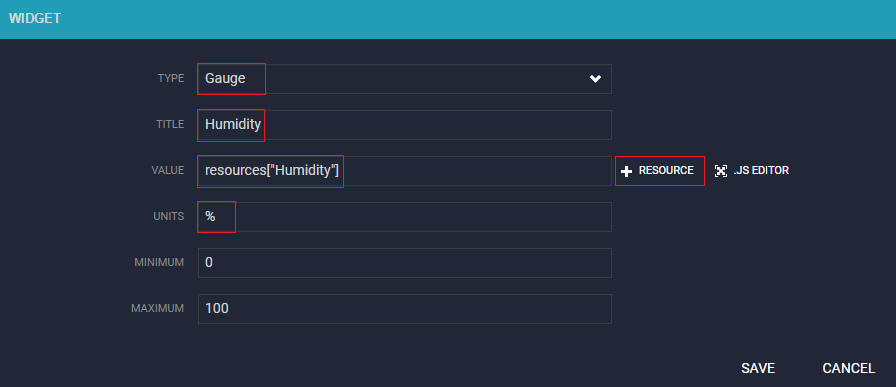
Repeat the same steps for the Humidity Widget as done for the Temperature. This time, select "Gauge" for Type, enter "Humidity" for Title, select "Humidity" from the Resource list, and enter "%" for Units. Leave Minimum as "0" and Maximum as "100".
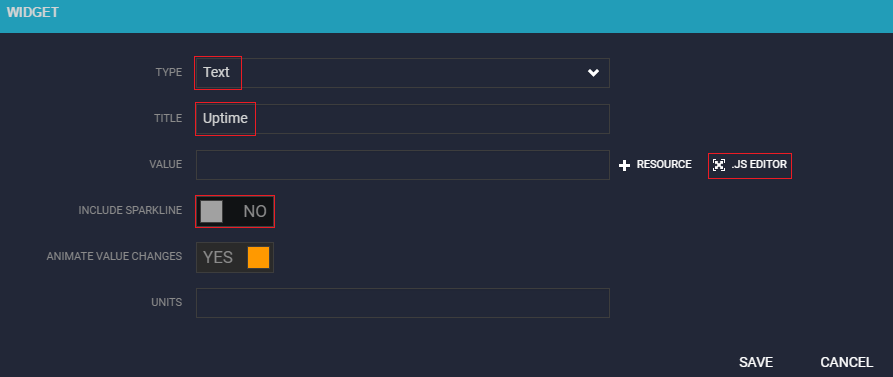
This project will take advantage of a feature in the Widget configuration to display Uptime properly. Exosite gives the ability to write short scripts for formatting and manipulating the data in Javascript. To create another new Widget, select "Text" for Type, enter "Uptime" for Title, select "NO" for Include Sparkline, and leave Units blank. The click on the ".JS Editor" button.
This will open up a screen with an editor in which one can write the formatting script. Included with the exosite_http library files that were downloaded earlier was a text file named "uptime_js.txt". It contains a short script written to take the Uptime Resource that is in seconds, and display it as days, hours, etc. Copy the contents of that file into the Javascript Editor.
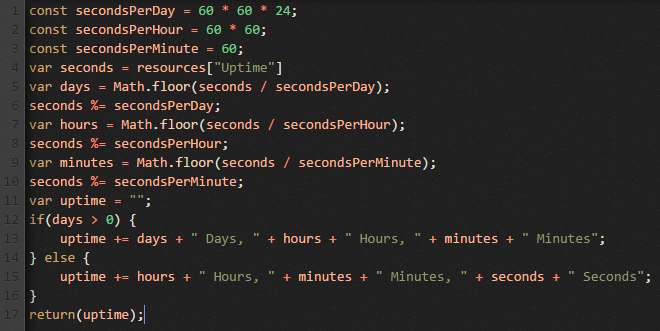
Everything inside the editor is treated as though it is inside one big function, so functioning code can be input immediately. Within the script, Resources can be accessed from a collection called "resources" that is keyed by the Resource names. Data can then be manipulated and formatted as needed. At the end of the script, put the data that is to be displayed into a return statement. Whatever is returned is what will be displayed on the Widget. The script should work as is, so just hit "Close" and then save the widget.
Full Implementation: Dashboard Complete
The dashboard is configured and the project is complete! Every time the device updates, the widget will be too, which will be visible. Also, if the reset button is hit, the uptime will reset as well.
If one would like to continue to improve or change this project, it is highly suggested to read through Exosite's HTTP documentation, as well as go through the exosite_htty library implementation and the HTTP client header documentation.
Some ideas for adding additional functions to the project include:
- Add an additional sensor and add its data to what's pushed to Exosite.
- Add alert light Widgets that are configured to be green if conditions are optimal and red if conditions are dangerous.
- Connect a fan to the board through a relay circuit. Then configure a switch Widget that will allow the user to turn the fan on and off.
| Author: | Mitchell Rose |
| MSOE Student and Intern at CCS, Inc. |
For online materials, visit: https://www.ccsinfo.com/InspiredProjects


